Nowadays, everyone would have heard about the "Single Page Applications". Many of the well-known websites such as Gmail use the concept of Single Page Applications (SPA's).
SPA's is the concept wherein when a user requests for a different page, the application will not navigate to that page but instead display the view of the new page within the existing page itself.
It gives the feeling to the user that he never left the page in the first place. The same can be achieved in the Angular with the help of Views in conjunction with Routes.
In this tutorial, you will learn-
- What is a View?
- ng-view Directive in AngularJS
- ng-view Example
What is a View?
A view is the content which is shown to the user. Basically what the user wants to see, accordingly that view of the application will be shown to the user.
The combination of views and Routes helps one into dividing an application in logical views and bind different views to Controllers.
Dividing the application into different views and using Routing to load different part of application helps in logically dividing the application and making it more manageable.
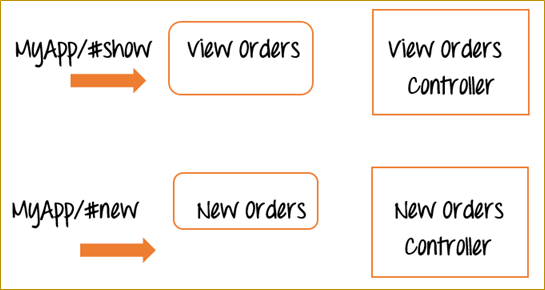
Let's assume that we have an ordering application, wherein a customer can view orders and place new ones.
The below diagram and subsequent explanation demonstrate how to make this application as a single page application.
Now, instead of having two different web pages, one for "View orders" and another for "New Orders", in AngularJS, you would instead create two different views called "View Orders" and "New Orders" in the same page.
We will also have 2 reference links in our application called #show and #new.
- So when the application goes to MyApp/#show, it will show the view of the View Orders, at the same time it will not leave the page. It will just refresh the section of the existing page with the information of "View Orders". The same goes for the "New Orders" view.
So in this way it just becomes simpler to separate the application into different views to make it more manageable and easy to make changes whenever required.
And each view will have a corresponding controller to control the business logic for that functionality.
ng-view Directive in AngularJS
The "ngView" is a directive that complements the $route service by including the rendered template of the current route into the main layout (index.html) file.
Every time the current route changes, the view included changes to it according to the configuration of the $route service without changing the page itself.
We will be covering routes in a later chapter, for now, we will focus on adding multiple views to our application.
Below is the entire flowchart of how the entire process works. We will go through in detail for every process in our example shown below.
ng-view Example
Let's take a look at an example of how we can implement views.
In our example, we are going to present two options to the user,
- One is to Display an "Event", and the other is to add an "Event".
- When the user clicks on the Add an Event link, they will be shown the view for "Add Event" and the same goes for "Display Event."
Please follow the steps below to get this example in place.
Step 1) Include the angular-route file as a script reference.
This route file is necessary in order to make use of the functionalities of having multiple routes and views. This file can be downloaded from the angularJS website.
Step 2) In this step,
- Add href tags which will represent links to "Adding a New Event" and "Displaying an Event".
- Also, add a div tag with the ng-view directive which will represent the view.
This will allow the corresponding view to be injected whenever the user clicks on either the "Add New Event link" or the "Display Event link."
Step 3) In your script tag for Angular JS, add the following code.
Let's not worry about the routing, for now, we will see this in a later chapter. Let's just see the code for the views for now.
- This section of code means that when the user clicks on the href tag "NewEvent" which was defined in the div tag earlier. It will go to the web page add_event.html, and will take the code from there and inject it into the view. Secondly for processing the business logic for this view, go to the "AddEventController".
- This section of code means that when the user clicks on the href tag "DisplayEvent" which was defined in the div tag earlier. It will go to the web page show_event.html, take the code from there and inject it into the view. Secondly, for processing the business logic for this view, go to the "ShowDisplayController".
- This section of code means that the default view shown to the user is the DisplayEvent view
Step 4) Next is to add controllers to process the business logic for both the "DisplayEvent" and "Add New Event" functionality.
We are just simply adding a message variable to each scope object for each controller. This message will get displayed when the appropriate view is shown to the user.
<!DOCTYPE html>
<html>
<head>
    <meta chrset="UTF 8">
    <title>Event Registration</title>
    <script src="https://code.angularjs.org/1.5.9/angular-route.js"></script>
    <script src="https://code.angularjs.org/1.5.9/angular.min.js"></script>
    <script src="lib/bootstrap.js"></script>

</head>
<body ng-app="sampleApp">

<h1> Guru99 Global Event</h1>

<div class="container">
    <ul><li><a href="#!NewEvent"> Add New Event</a></li>
        <li><a href="#!DisplayEvent"> Display Event</a></li>
    </ul>
    <div ng-view></div>
</div>

<script>
    var app = angular.module('sampleApp',["ngRoute"]);
    app.config(function($routeProvider){
        $routeProvider.
        when("/NewEvent",{
            templateUrl : "add_event.html",
            controller: "AddEventController"
        }).
        when("/DisplayEvent", {
            templateUrl: "show_event.html",
            controller: "ShowDisplayController"
        }).
        otherwise ({
            redirectTo: '/DisplayEvent'
        });
    });
    app.controller("AddEventController", function($scope) {

        $scope.message = "This is to Add a new Event";

    });
    app.controller("ShowDisplayController",function($scope){

        $scope.message = "This is display an Event";

    });
</script>
</body>
</html>
Step 5) Create pages called add_event.html and show_event.html. Keep the pages simple as shown below.
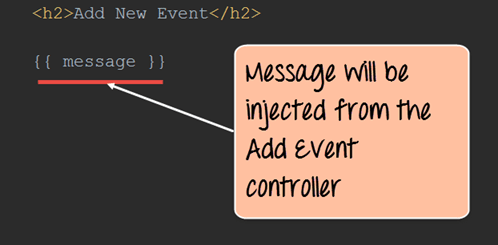
In our case, the add_event.html page will have a header tag along with the text "Add New Event" and have an expression to display the message "This is to Add a new Event".
Similarly, the show_event.html page will also have a header tag to hold the text "Show Event" and also have a message expression to display the message "This is to display an Event."
The value of the message variable will be injected based on the controller which is attached to the view.
For each page, we are going to add the message variable, which will be injected from each respective controller.
- add_event.html
<h2>Add New Event</h2>

{{message}}
- show_event.html
<h2>Show Event</h2>

{{message}}
If the code is executed successfully, the following Output will be shown when you run your code in the browser.
Output:
From the output, we can notice 2 things
- The address bar will reflect what is the current view being displayed. So since the default view is to show the Show Event screen, the address bar shows the address for "DisplayEvent".
- This section is the View, which gets created on the fly. Since the default view is the Show Event one, this is what gets displayed to the user.
Now click on the Add New Event link in the page displayed. You will now get the below output.
Output:
- The address bar will now reflect that the current view is now the "Add new Event" view. Notice that you will still be on the same application page. You will not be directed to a new application page.
- This section is the View, and it will now change to show the HTML for the "Add new event" functionality. So now in this section the header tag "Add New Event" and the text "This is to Add a new Event" is displayed to the user.


No comments:
Post a Comment